Basic Usage
1. Add your AI models
- The tool uses Large Language Model (LLMs) to perform various tasks in a QA pipeline. So, you need to provide the application with access to the LLMs you want to use.
- You only need to provide at least one. However, it is recommended that you include all the LLMs that you have access to, you will be able to switch between them while using the application.
To add a model:
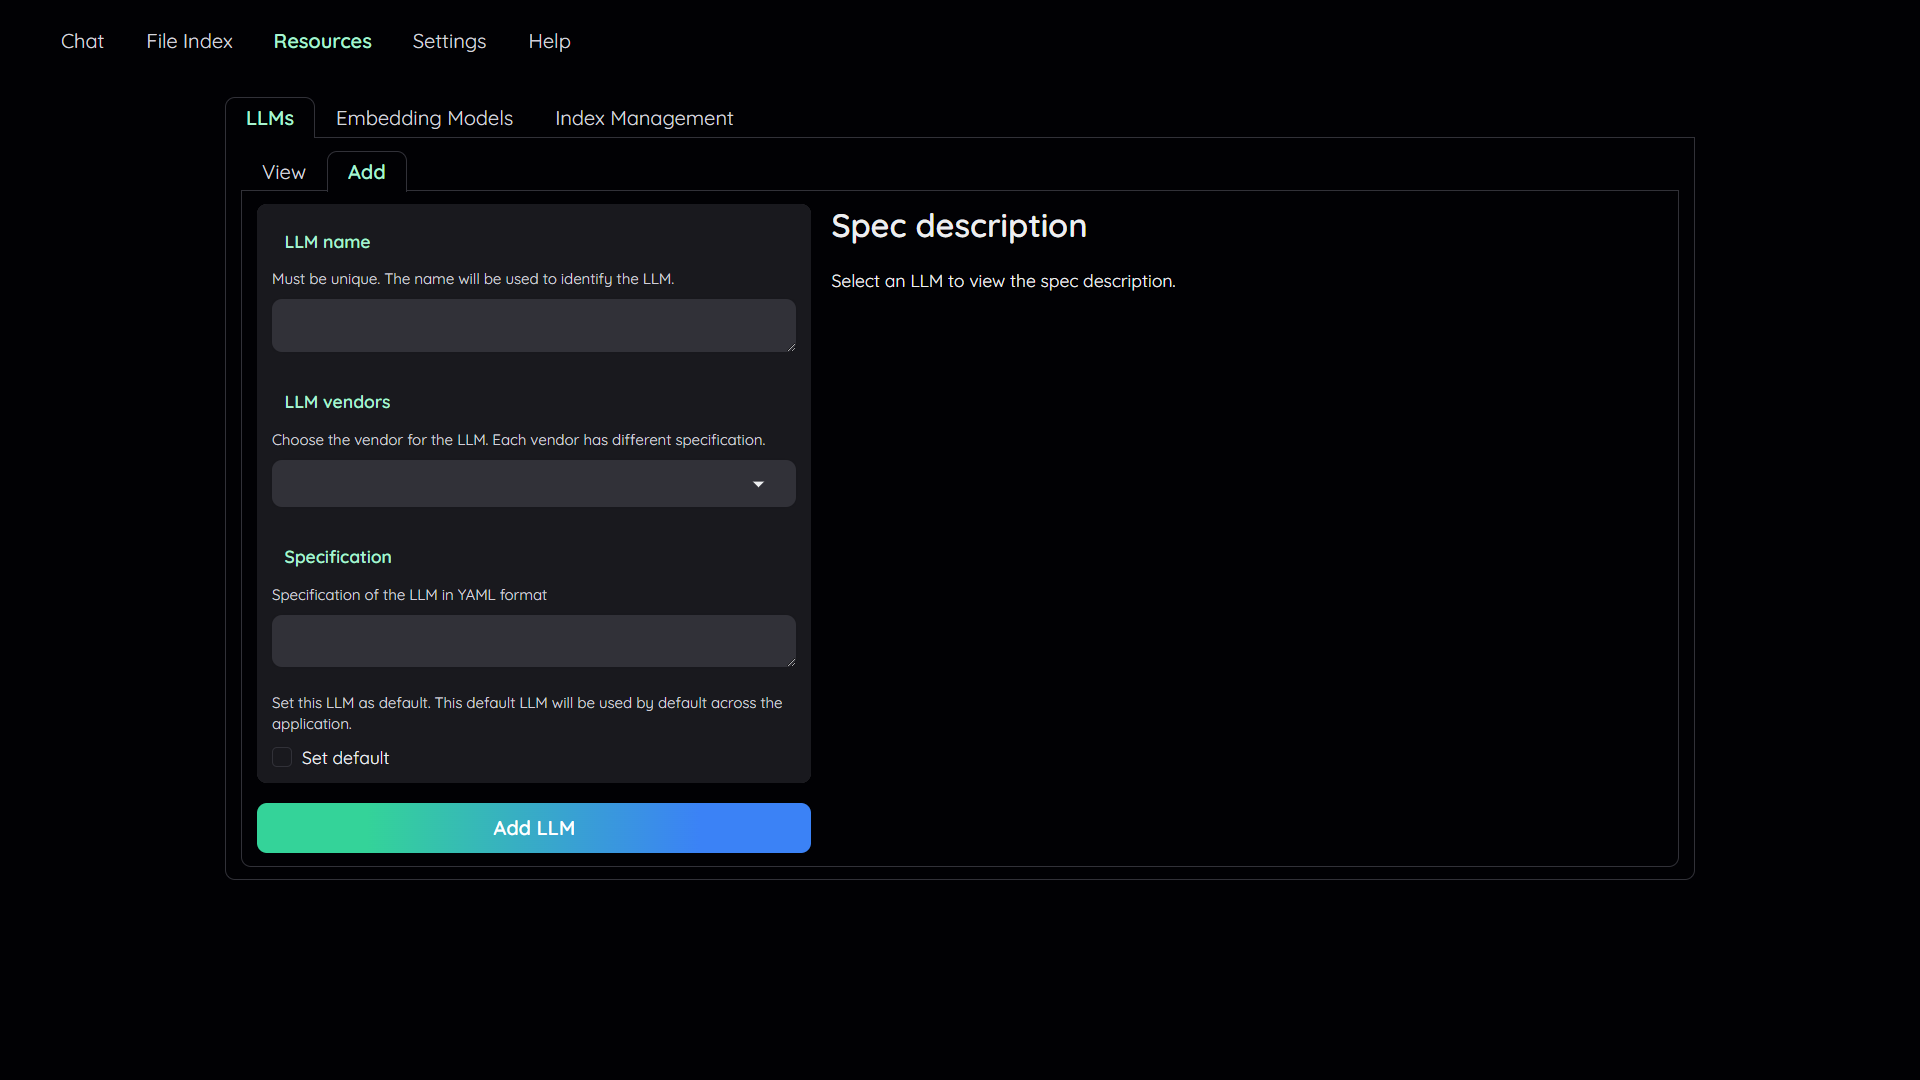
- Navigate to the
Resourcestab. - Select the
LLMssub-tab. - Select the
Addsub-tab. - Config the model to add:
- Give it a name.
- Pick a vendor/provider (e.g.
ChatOpenAI). - Provide the specifications.
- (Optional) Set the model as default.
- Click
Addto add the model. - Select
Embedding Modelssub-tab and repeat the step 3 to 5 to add an embedding model.
(Optional) Configure model via the .env file
Alternatively, you can configure the models via the .env file with the information needed to connect to the LLMs. This file is located in
the folder of the application. If you don't see it, you can create one.
Currently, the following providers are supported:
OpenAI
In the .env file, set the OPENAI_API_KEY variable with your OpenAI API key in order
to enable access to OpenAI's models. There are other variables that can be modified,
please feel free to edit them to fit your case. Otherwise, the default parameter should
work for most people.
Azure OpenAI
For OpenAI models via Azure platform, you need to provide your Azure endpoint and API key. Your might also need to provide your developments' name for the chat model and the embedding model depending on how you set up Azure development.
Local models
Pros:
- Privacy. Your documents will be stored and process locally.
- Choices. There are a wide range of LLMs in terms of size, domain, language to choose from.
- Cost. It's free.
Cons:
- Quality. Local models are much smaller and thus have lower generative quality than paid APIs.
- Speed. Local models are deployed using your machine so the processing speed is limited by your hardware.
Find and download a LLM
You can search and download a LLM to be ran locally from the Hugging Face Hub. Currently, these model formats are supported:
- GGUF
You should choose a model whose size is less than your device's memory and should leave about 2 GB. For example, if you have 16 GB of RAM in total, of which 12 GB is available, then you should choose a model that take up at most 10 GB of RAM. Bigger models tend to give better generation but also take more processing time.
Here are some recommendations and their size in memory:
- Qwen1.5-1.8B-Chat-GGUF: around 2 GB
Enable local models
To add a local model to the model pool, set the LOCAL_MODEL variable in the .env
file to the path of the model file.
Here is how to get the full path of your model file:
- On Windows 11: right click the file and select
Copy as Path.
2. Upload your documents
In order to do QA on your documents, you need to upload them to the application first.
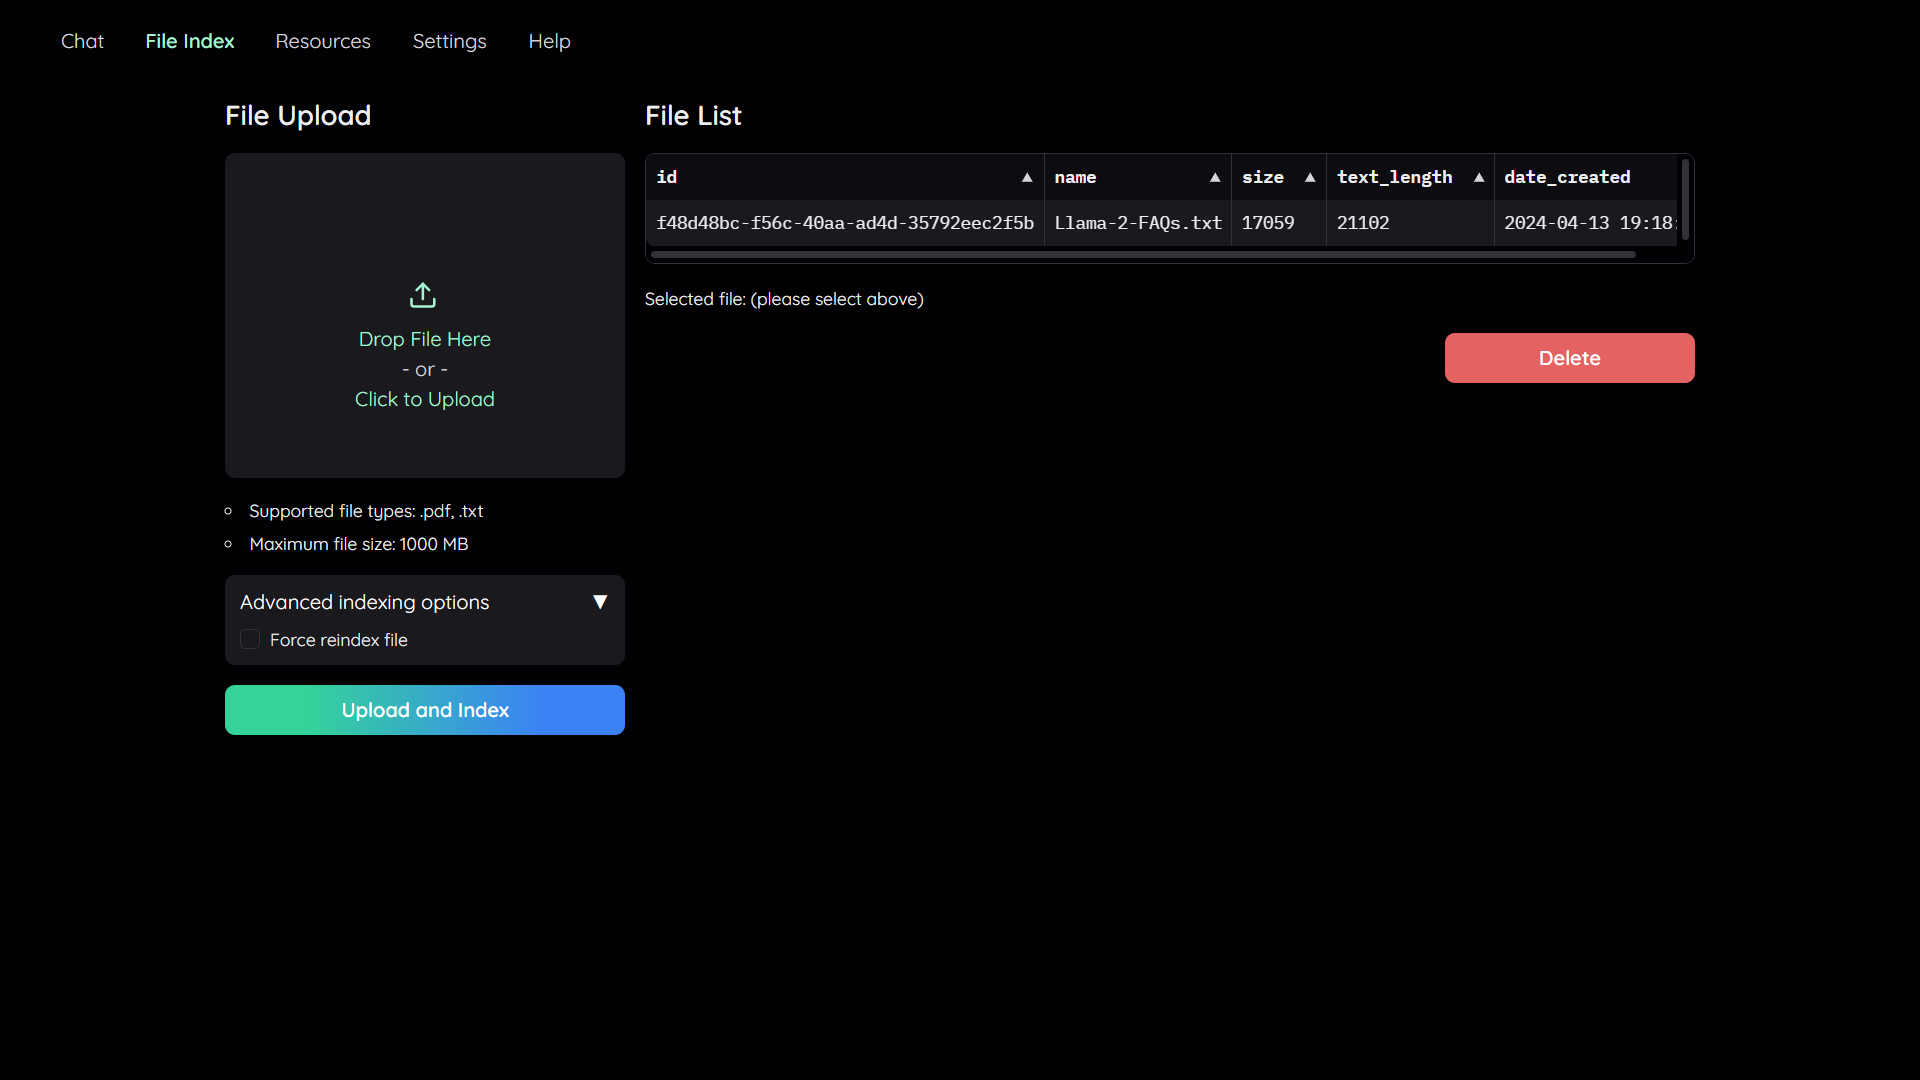
Navigate to the File Index tab and you will see 2 sections:
- File upload:
- Drag and drop your file to the UI or select it from your file system.
Then click
Upload and Index. - The application will take some time to process the file and show a message once it is done.
- Drag and drop your file to the UI or select it from your file system.
Then click
- File list:
- This section shows the list of files that have been uploaded to the application and allows users to delete them.
3. Chat with your documents

Now navigate back to the Chat tab. The chat tab is divided into 3 regions:
- Conversation Settings Panel
- Here you can select, create, rename, and delete conversations.
- By default, a new conversation is created automatically if no conversation is selected.
- Below that you have the file index, where you can choose whether to disable, select all files, or select which files to retrieve references from.
- If you choose "Disabled", no files will be considered as context during chat.
- If you choose "Search All", all files will be considered during chat.
- If you choose "Select", a dropdown will appear for you to select the files to be considered during chat. If no files are selected, then no files will be considered during chat.
- Here you can select, create, rename, and delete conversations.
- Chat Panel
- This is where you can chat with the chatbot.
- Information Panel
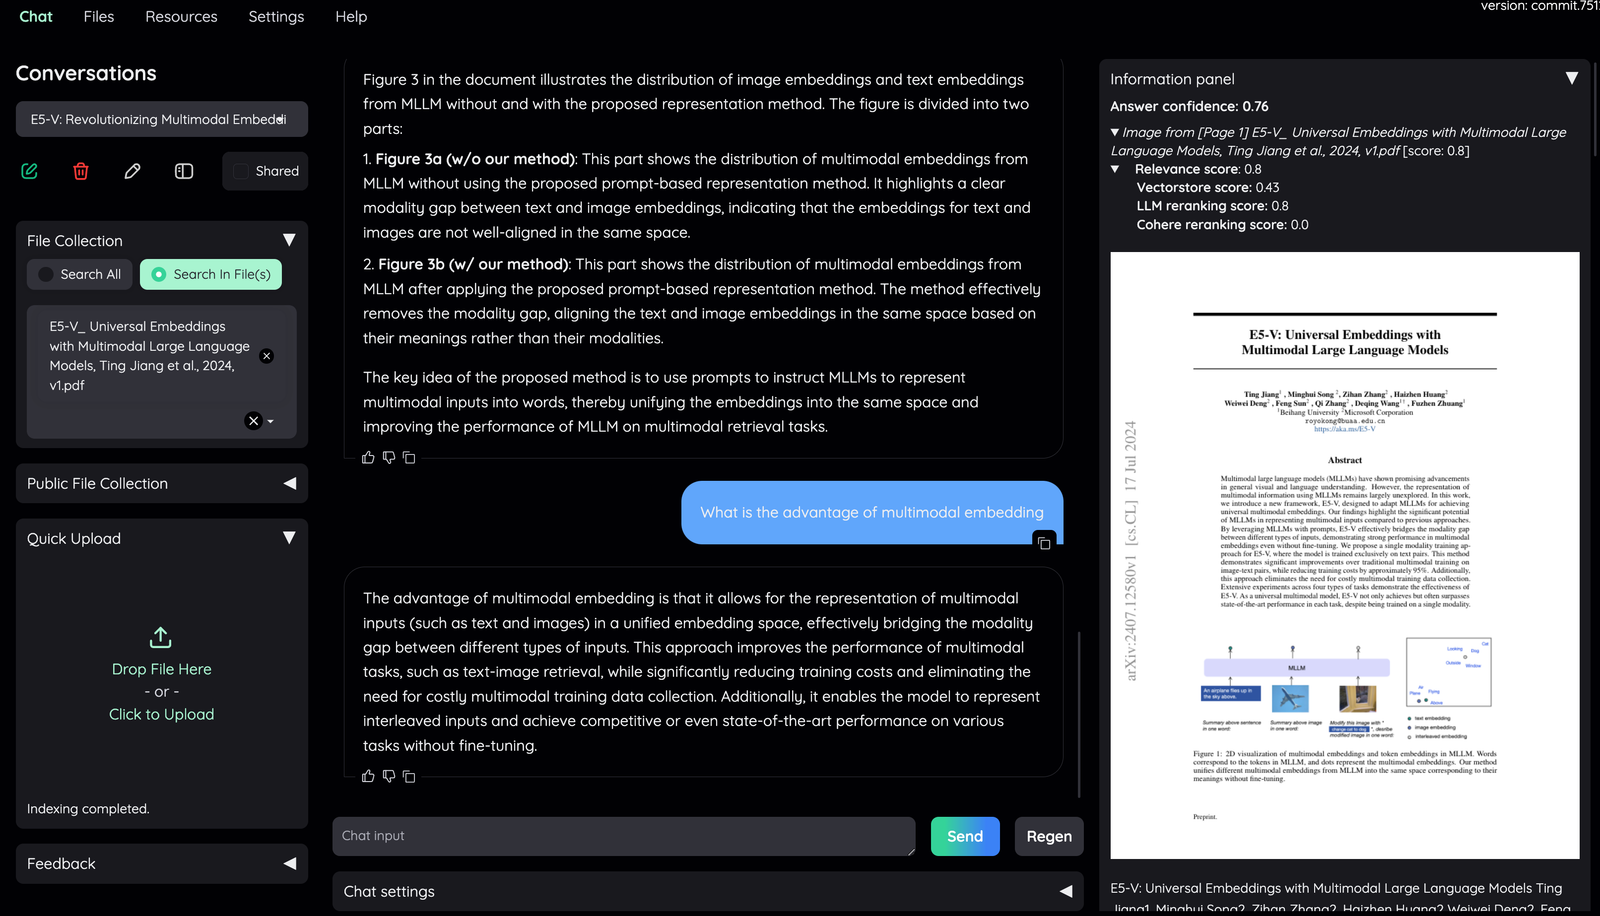
- Supporting information such as the retrieved evidence and reference will be displayed here.
- Direct citation for the answer produced by the LLM is highlighted.
- The confidence score of the answer and relevant scores of evidences are displayed to quickly assess the quality of the answer and retrieved content.
- Meaning of the score displayed:
- Answer confidence: answer confidence level from the LLM model.
- Relevance score: overall relevant score between evidence and user question.
- Vectorstore score: relevant score from vector embedding similarity calculation (show
full-text searchif retrieved from full-text search DB). - LLM relevant score: relevant score from LLM model (which judge relevancy between question and evidence using specific prompt).
- Reranking score: relevant score from Cohere reranking model.
Generally, the score quality is LLM relevant score > Reranking score > Vectorscore.
By default, overall relevance score is taken directly from LLM relevant score. Evidences are sorted based on their overall relevance score and whether they have citation or not.